
FutureNet
NXR,VXRシリーズ
無線LAN編
3. 無線LAN設定(NXR-160/LW)
3-4. 無線LAN設定(MACアドレスフィルタリング)
無線LAN端末(ステーション)のMACアドレス情報を元に接続制限を行う設定例です。なおこの機能はVAP毎に設定することができます。
【対象機種】NXR-160/LW(2020/12現在)
最新の対応状況は、各製品の更新履歴やユーザーズガイドをご確認ください。
| コンテンツ | ||||
| 構成図 | 設定例 | 設定例解説 | 端末の設定例 | 付録 |
【 構成図 】
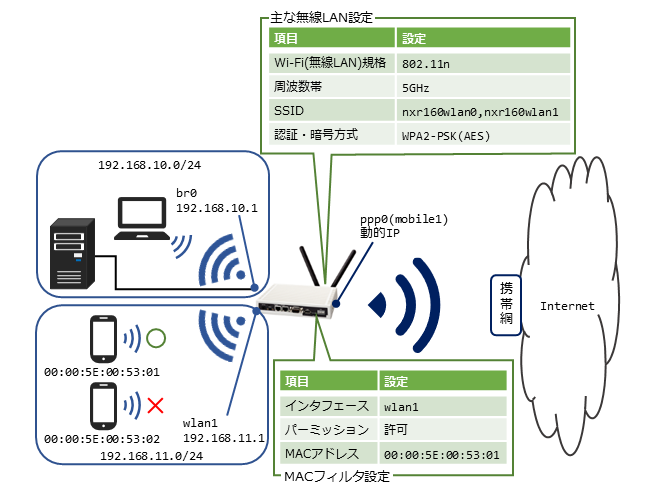
- SSID「nxr160wlan1」(wlan1インタフェース)でMACアドレスフィルタリングを設定し、指定したMACアドレスの無線端末のみ通信を許可するように設定します。
- TELNETとHTTPのforbidden-access-wanが有効になっている場合、それらを使用してbridge,wlanインタフェースのIPアドレスにアクセスすることはできません。そのため、この設定例ではbridge0インタフェースでTELNETとHTTPアクセスを許可するフィルタを設定します。
【 設定例 】
nxr160(config)#ip access-list br0_in permit 192.168.10.0/24 192.168.10.1 tcp any 23
nxr160(config)#ip access-list br0_in permit 192.168.10.0/24 192.168.10.1 tcp any 880
nxr160(config)#interface bridge 0
nxr160(config-bridge)#ip address 192.168.10.1/24
nxr160(config-bridge)#ip access-group in br0_in
nxr160(config-bridge)#exit
nxr160(config)#interface ethernet 0
nxr160(config-if)#no ip address
nxr160(config-if)#bridge-group 0 port 1
nxr160(config-if)#exit
nxr160(config)#interface wlan 0
nxr160(config-wlan)#no ip address
nxr160(config-wlan)#bridge-group 0 port 2
nxr160(config-wlan)#wlan ssid nxr160wlan0
nxr160(config-wlan)#wlan wpa-psk password nxr160wlan0pass
nxr160(config-wlan)#wlan authenticate wpa2-psk aes
nxr160(config-wlan)#wlan guest-mode enable
nxr160(config-wlan)#wlan access-point-bridge enable
nxr160(config-wlan)#wlan max-associations 16
nxr160(config-wlan)#exit
nxr160(config)#interface wlan 1
nxr160(config-wlan)#ip address 192.168.11.1/24
nxr160(config-wlan)#wlan ssid nxr160wlan1
nxr160(config-wlan)#wlan wpa-psk password nxr160wlan1pass
nxr160(config-wlan)#wlan authenticate wpa2-psk aes
nxr160(config-wlan)#wlan guest-mode enable
nxr160(config-wlan)#wlan access-point-bridge enable
nxr160(config-wlan)#wlan max-associations 16
nxr160(config-wlan)#wlan mac access-list permission permit
nxr160(config-wlan)#wlan mac access-list address 00:00:5E:00:53:01
nxr160(config-wlan)#exit
nxr160(config)#wifi 0
nxr160(config-wifi)#mode 11na
nxr160(config-wifi)#channel auto
nxr160(config-wifi)#exit
nxr160(config)#dhcp-server 1
nxr160(config-dhcps)#network 192.168.10.0/24 range 192.168.10.200 192.168.10.210
nxr160(config-dhcps)#gateway 192.168.10.1
nxr160(config-dhcps)#dns-server 192.168.10.1
nxr160(config-dhcps)#exit
nxr160(config)#dhcp-server 2
nxr160(config-dhcps)#network 192.168.11.0/24 range 192.168.11.200 192.168.11.210
nxr160(config-dhcps)#gateway 192.168.11.1
nxr160(config-dhcps)#dns-server 192.168.11.1
nxr160(config-dhcps)#exit
nxr160(config)#ip route 0.0.0.0/0 ppp 0
nxr160(config)#ppp account username [ユーザID] password [パスワード]
nxr160(config)#interface ppp 0
nxr160(config-ppp)#ip address negotiated
nxr160(config-ppp)#ip masquerade
nxr160(config-ppp)#ip spi-filter
nxr160(config-ppp)#ip tcp adjust-mss auto
nxr160(config-ppp)#ppp username [ユーザID]
nxr160(config-ppp)#mobile apn [APN] cid 1 pdp-type ip
nxr160(config-ppp)#dial-up string *99***1#
nxr160(config-ppp)#dial-up timeout 30
nxr160(config-ppp)#exit
nxr160(config)#mobile error-recovery-reset
nxr160(config)#mobile termination-recovery reset
nxr160(config)#mobile 1 ppp 0
nxr160(config)#mobile 1 carrier [キャリア]
nxr160(config)#exit
nxr160#clear mobile 1
nxr160#configure terminal
nxr160(config)#dns
nxr160(config-dns)#service enable
nxr160(config-dns)#exit
nxr160(config)#exit
nxr160#save config
【 設定例解説 】
1. <IPアクセスリスト設定>
nxr160(config)#ip access-list br0_in permit 192.168.10.0/24 192.168.10.1 tcp any 880
IPアクセスリストbr0_inを以下のルールで設定します。
- 送信元IPアドレス192.168.10.0/24、宛先IPアドレス192.168.10.1、宛先TCPポート23番を許可
- 送信元IPアドレス192.168.10.0/24、宛先IPアドレス192.168.10.1、宛先TCPポート880番を許可
(☞) IPアクセスリストを設定しただけではフィルタとして有効にはなりません。フィルタリングを行うインタフェースでの登録が必要になります。
2. <bridge0インタフェース設定>
nxr160(config-bridge)#ip address 192.168.10.1/24
bridge0インタフェースのIPアドレスを設定します。
IPアクセスグループのinフィルタにIPアクセスリストbr0_inを設定します。
3. <ethernet0インタフェース設定>
nxr160(config-if)#no ip address
ethernet0インタフェースのIPアドレスを無効にします。
ブリッジグループを設定します。
(☞) ブリッジグループの番号はbridgeインタフェースの番号と同一のものを設定します。またポートはブリッジグループ内でユニークなものを設定する必要があります。
4. <wlan0インタフェース設定>
nxr160(config-wlan)#no ip address
wlan0インタフェースのIPアドレスを無効にします。
ブリッジグループを設定します。
SSIDを設定します。
WPA-PSK認証方式で使用するパスワードを設定します。
(☞) WPA-PSK認証方式で使用するパスワードは、WPA-PSKの認証方式および暗号化方式よりも先に設定する必要があります。
認証方式と暗号化方式を設定します。
ゲストモードを有効に設定します。
(☞) ANY接続拒否機能,ステルス機能は連動して動作するためゲストモードでの一括設定となります。
アクセスポイントブリッジを有効に設定します。
(☞) アクセスポイントブリッジを有効に設定することでプライバシープロテクションが無効になります。
接続台数制限を設定します。
5. <wlan1インタフェース設定>
nxr160(config-wlan)#ip address 192.168.11.1/24
wlan1インタフェースのIPアドレスを設定します。
SSIDを設定します。
WPA-PSK認証方式で使用するパスワードを設定します。
認証方式と暗号化方式を設定します。
ゲストモードを有効に設定します。
アクセスポイントブリッジを有効に設定します。
接続台数制限を設定します。
MACアクセスリストのパーミッションを許可に設定します。
(☞) MACアクセスリストに含まれるステーションのみ接続を許可します。
MACアクセスリストにMACアドレスを登録します。
(☞) MACアクセスリストのパーミッションで許可を設定していますので、ここで登録するMACアドレスは接続を許可するステーションのMACアドレスになります。
6. <wifi0設定>
nxr160(config-wifi)#mode 11na
無線方式を設定します。
チャネルを設定します。
(☞) modeコマンドが未設定の場合、設定することはできません。
7. <DHCPサーバ設定>
nxr160(config-dhcps)#network 192.168.10.0/24 range 192.168.10.200 192.168.10.210
nxr160(config-dhcps)#gateway 192.168.10.1
nxr160(config-dhcps)#dns-server 192.168.10.1
DHCPサーバ1を設定します。
(☞) このDHCPサーバはbridge0インタフェースで動作します。
nxr160(config-dhcps)#network 192.168.11.0/24 range 192.168.11.200 192.168.11.210
nxr160(config-dhcps)#gateway 192.168.11.1
nxr160(config-dhcps)#dns-server 192.168.11.1
DHCPサーバ2を設定します。
(☞) このDHCPサーバはwlan1インタフェースで動作します。
8. <スタティックルート設定>
デフォルトルートを設定します。
9. <PPPアカウント設定>
PPP接続で使用するユーザID,パスワードを設定します。
10. <WAN側(ppp0)インタフェース設定>
nxr160(config-ppp)#ip address negotiated
ppp0インタフェースのIPアドレスをnegotiatedに設定します。
nxr160(config-ppp)#ip spi-filter
IPマスカレード、ステートフルパケットインスペクションを有効にします。
TCP MSSの調整機能をオートに設定します。
PPP接続用ユーザIDを設定します。
APN,CID,PDPタイプを設定します。
(☞) モバイルキャリア設定でKDDI(KDDI MVNO含む)を選択する場合、KDDI MNO SIMを使用する場合はCIDを「2」に、KDDI MVNO SIMを使用する場合はCIDを「1」に設定します。
発信用の電話番号を設定します。
(☞) 電話番号の#の前の数字はCIDを表しています。
ダイアルタイムアウトを設定します。
11. <モバイルエラーリカバリー設定>
通信モジュールとの通信に重大な問題が発生する可能性が高いと判断した場合、通信モジュールのリセットを行うように設定します。
12. <モバイルターミネーションリカバリー設定>
PPP接続時に網側から切断された場合、通信モジュールのリセットを行うように設定します。
13. <モバイル割り当て設定>
mobile1として認識されている内蔵通信モジュールとppp0インタフェースの関連づけを行います。
内蔵通信モジュールをPPPインタフェースで使用する場合は、mobileコマンドによるPPPインタフェースへの関連付けが必要になります。
(☞) mobile1の情報はshow mobile 1コマンドで確認することができます。
14. <モバイルキャリア設定>
mobile1(内蔵通信モジュール)のキャリアを設定します。
(☞) キャリア設定は「clear mobile 1」コマンドによるモバイルリセットを行うことで反映されます。
15. <DNS設定>
nxr160(config-dns)#service enable
DNSサービスを有効にします。
16. <設定の保存>
設定内容を保存します。
【 端末の設定例 】
| 192.168.10.0/24 | 192.168.11.0/24 | ||
| 有線端末 | 無線端末 | 無線端末 | |
| IPアドレス | 192.168.10.100 | DHCPサーバから取得 | DHCPサーバから取得 |
| サブネットマスク | 255.255.255.0 | ||
| デフォルトゲートウェイ | 192.168.10.1 | ||
| DNSサーバ | |||
【 付録 】
目次
更新情報
→ 一覧へ- 2026.04.01NXR,VXR
IPsec編
4-9. Cloudflare WAN 接続(IPsec NAT-T/二重トンネル/ECMP/フェイルオーバー) - 2026.04.01NXR,VXR
IPsec編
4-8. Cloudflare WAN 接続(IPsec/二重トンネル/ECMP/フェイルオーバー) - 2026.03.10CB
CB-230編
1.1 CB-230 シリアルポートからのアラーム(バッテリー電圧異常)を受けてMAをシャットダウンさせる - 2026.03.05NXR,VXR
REST-API編
2-8. exec系,showコマンドの実行(maint/cli) - 2026.01.20NXR,VXR
無線LAN編
5-6. 無線 LAN 設定(802.11ax/6 GHz/RADIUS)
カテゴリ
タグ
- CRG
- DDNS
- DHCP
- DNAT
- DNSインターセプト
- Ethernet
- IIJモバイル
- IKE Modeconfig
- IKEv2 Configuration Payload
- IPinIP
- IPoE
- IPv6
- KDDI
- L2TPv3
- MAP-E
- NGN
- NTTドコモ
- PBR
- Policy Based IPsec
- PPP
- PPPoE
- QoS
- RADIUS連携
- RAシリーズ
- Route Based IPsec
- SMS
- SNAT
- SoftBank
- UPnP
- URL転送
- VLAN
- VRRP
- Web認証
- WiMAX
- コンフィグロールバック
- ネットイベント
- フィルタ
- ブリッジ
- モニタログ
- ワイモバイル
- 仮想スイッチ
- 冗長化
- 無線LAN