
FutureNet
NXR,VXRシリーズ
無線LAN編
2. 無線LAN設定(NXR-G260シリーズ)
2-6. 無線LAN設定6(VAPとVLANの利用)
VAPごとに異なるSSIDを設定し、かつVLANを設定してネットワークを分割する設定例です。なお他のネットワークへの通信を禁止します。ただし各ネットワークからのインターネットアクセスは許可します。
【対象機種】NXR-G260シリーズ
| コンテンツ | ||||||
| 構成図 | 設定データ | 設定例 | 設定例解説 | 端末の設定例 | 補足 | 付録 |
【 構成図 】
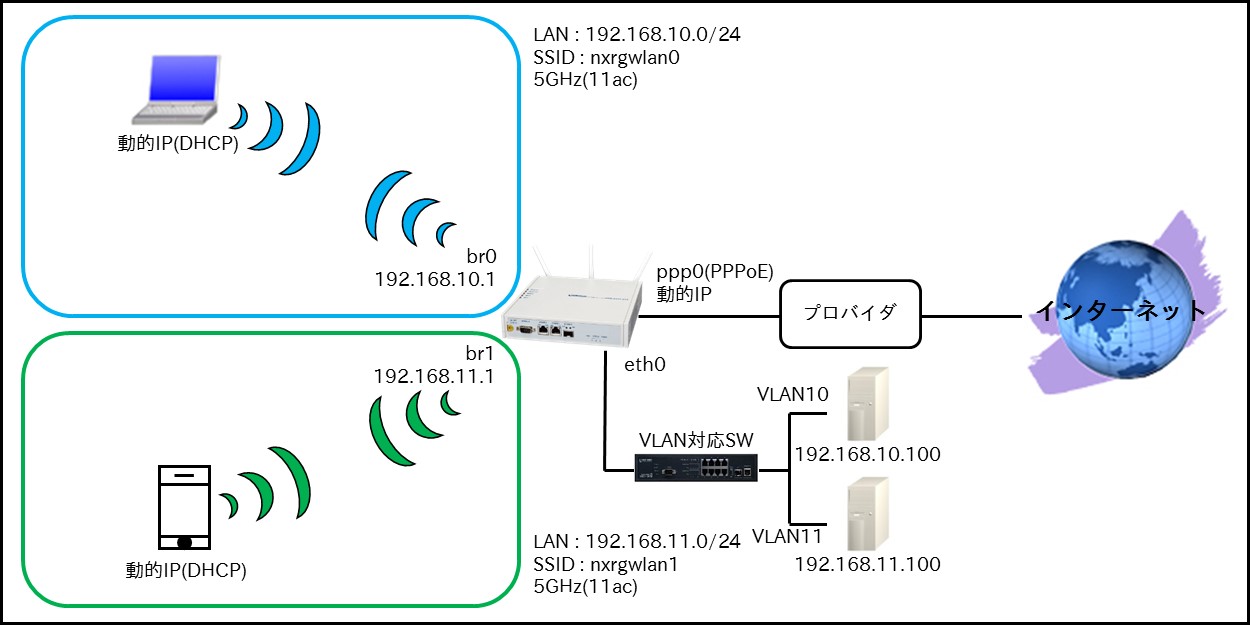
- SSIDは「nxrgwlan0」,「nxrgwlan1」の2つを設定します。
- SSID「nxrgwlan0」の無線LANインタフェース(wlan0)とethernet0(vid10)インタフェースをブリッジして使用します。
- SSID「nxrgwlan1」の無線LANインタフェース(wlan1)とethernet0(vid11)インタフェースをブリッジして使用します。
- DHCPサーバを動作させることで、無線LAN端末,有線LAN端末(ethernet0(vid10,11)インタフェース配下のみ)それぞれにIPアドレスを配布します。
- ブリッジインタフェース間での通信を禁止するためIPフィルタを設定します。
【 設定データ 】
| 設定項目 | 設定内容 | |||
|---|---|---|---|---|
| ブリッジインタフェース | bridge0 | IPアドレス | 192.168.10.1/24 | |
| IPアクセスグループ | forward-in | br0_forward-in | ||
| bridge1 | IPアドレス | 192.168.11.1/24 | ||
| IPアクセスグループ | forward-in | br1_forward-in | ||
| 有線LAN側インタフェース | ethernet0のIPアドレス | 無効 | ||
| ethernet0 vid 10 | IPアドレス | 無効 | ||
| ブリッジグループ番号 | 0(port1) | |||
| ethernet0 vid 11 | IPアドレス | 無効 | ||
| ブリッジグループ番号 | 1(port1) | |||
| 無線LAN側インタフェース | wlan0 | wlan0のIPアドレス | 無効 | |
| ブリッジグループ番号 | 0(port2) | |||
| SSID | nxrgwlan0 | |||
| 認証方式 | WPA2-PSK | |||
| 暗号方式 | AES | |||
| パスワード | nxrgwlan0pass | |||
| ANY接続 | 拒否しない | |||
| SSID隠蔽 | しない | |||
| プライバシープロテクション | 無効 | |||
| 接続台数制限 | 32台 | |||
| wlan1 | wlan1のIPアドレス | 無効 | ||
| ブリッジグループ番号 | 1(port2) | |||
| SSID | nxrgwlan1 | |||
| 認証方式 | WPA2-PSK | |||
| 暗号方式 | AES | |||
| パスワード | nxrgwlan1pass | |||
| ANY接続 | 拒否しない | |||
| SSID隠蔽 | しない | |||
| プライバシープロテクション | 無効 | |||
| 接続台数制限 | 32台 | |||
| 無線モジュール(wifi0) | 無線方式 | 11ac | ||
| チャネル | オート | |||
| WAN側インタフェース | PPPoEクライアント(ethernet1) | ppp0 | ||
| ppp0のIPアドレス | 動的IPアドレス | |||
| IPマスカレード | 有効 | |||
| SPIフィルタ | 有効 | |||
| TCP MSS調整 | オート | |||
| ISP接続用ユーザID | test1@example.jp | |||
| ISP接続用パスワード | test1pass | |||
| スタティックルート | 宛先IPアドレス | 0.0.0.0/0 | ||
| ゲートウェイ(インタフェース) | ppp0 | |||
| IPフィルタ | ルール名 | br0_forward-in | ||
| br0_forward-in | 動作 | 破棄 | ||
| 送信元IPアドレス | 192.168.10.0/24 | |||
| 宛先IPアドレス | 192.168.11.0/24 | |||
| ルール名 | br1_forward-in | |||
| br1_forward-in | 動作 | 破棄 | ||
| 送信元IPアドレス | 192.168.11.0/24 | |||
| 宛先IPアドレス | 192.168.10.0/24 | |||
| DHCPサーバ | No.1 | IPアドレス払い出し範囲(始点) | 192.168.10.200 | |
| IPアドレス払い出し範囲(終点) | 192.168.10.210 | |||
| ゲートウェイ | 192.168.10.1 | |||
| プライマリDNSサーバ | 192.168.10.1 | |||
| No.2 | IPアドレス払い出し範囲(始点) | 192.168.11.200 | ||
| IPアドレス払い出し範囲(終点) | 192.168.11.210 | |||
| ゲートウェイ | 192.168.11.1 | |||
| プライマリDNSサーバ | 192.168.11.1 | |||
| DNS | サービス | 有効 | ||
| FastFowarding | 有効 | |||
【 設定例 】
Enter configuration commands, one per line. End with CNTL/Z.
nxrg260(config)#ip access-list br0_forward-in deny 192.168.10.0/24 192.168.11.0/24
nxrg260(config)#ip access-list br1_forward-in deny 192.168.11.0/24 192.168.10.0/24
nxrg260(config)#interface bridge 0
nxrg260(config-bridge)#ip address 192.168.10.1/24
nxrg260(config-bridge)#ip access-group forward-in br0_forward-in
nxrg260(config-bridge)#exit
nxrg260(config)#interface bridge 1
nxrg260(config-bridge)#ip address 192.168.11.1/24
nxrg260(config-bridge)#ip access-group forward-in br1_forward-in
nxrg260(config-bridge)#exit
nxrg260(config)#interface ethernet 0
nxrg260(config-if)#no ip address
nxrg260(config-if)#exit
nxrg260(config)#interface ethernet 0 vid 10
nxrg260(config-vlan)#bridge-group 0 port 1
nxrg260(config-vlan)#exit
nxrg260(config)#interface ethernet 0 vid 11
nxrg260(config-vlan)#bridge-group 1 port 1
nxrg260(config-vlan)#exit
nxrg260(config)#interface wlan 0
nxrg260(config-wlan)#no ip address
nxrg260(config-wlan)#bridge-group 0 port 2
nxrg260(config-wlan)#wlan ssid nxrgwlan0
nxrg260(config-wlan)#wlan wpa-psk password nxrgwlan0pass
nxrg260(config-wlan)#wlan authenticate wpa2-psk aes
nxrg260(config-wlan)#wlan guest-mode enable
nxrg260(config-wlan)#wlan access-point-bridge enable
nxrg260(config-wlan)#wlan max-associations 32
nxrg260(config-wlan)#exit
nxrg260(config)#interface wlan 1
nxrg260(config-wlan)#no ip address
nxrg260(config-wlan)#bridge-group 1 port 2
nxrg260(config-wlan)#wlan ssid nxrgwlan1
nxrg260(config-wlan)#wlan wpa-psk password nxrgwlan1pass
nxrg260(config-wlan)#wlan authenticate wpa2-psk aes
nxrg260(config-wlan)#wlan guest-mode enable
nxrg260(config-wlan)#wlan access-point-bridge enable
nxrg260(config-wlan)#wlan max-associations 32
nxrg260(config-wlan)#exit
nxrg260(config)#wifi 0
nxrg260(config-wifi)#mode 11ac
nxrg260(config-wifi)#channel auto
nxrg260(config-wifi)#exit
% Executing setup, Please Wait.
nxrg260(config)#dhcp-server 1
nxrg260(config-dhcps)#network 192.168.10.0/24 range 192.168.10.200 192.168.10.210
nxrg260(config-dhcps)#gateway 192.168.10.1
nxrg260(config-dhcps)#dns-server 192.168.10.1
nxrg260(config-dhcps)#exit
nxrg260(config)#dhcp-server 2
nxrg260(config-dhcps)#network 192.168.11.0/24 range 192.168.11.200 192.168.11.210
nxrg260(config-dhcps)#gateway 192.168.11.1
nxrg260(config-dhcps)#dns-server 192.168.11.1
nxrg260(config-dhcps)#exit
nxrg260(config)#ip route 0.0.0.0/0 ppp 0
nxrg260(config)#ppp account username test1@example.jp password test1pass
nxrg260(config)#interface ppp 0
nxrg260(config-ppp)#ip address negotiated
nxrg260(config-ppp)#ip masquerade
nxrg260(config-ppp)#ip spi-filter
nxrg260(config-ppp)#ip tcp adjust-mss auto
nxrg260(config-ppp)#ppp username test1@example.jp
nxrg260(config-ppp)#exit
nxrg260(config)#interface ethernet 1
nxrg260(config-if)#no ip address
nxrg260(config-if)#pppoe-client ppp 0
nxrg260(config-if)#exit
nxrg260(config)#dns
nxrg260(config-dns)#service enable
nxrg260(config-dns)#exit
nxrg260(config)#fast-forwarding enable
nxrg260(config)#exit
nxrg260#save config
【 設定例解説 】
1. <IPアクセスリスト設定>
IPアクセスリスト名をbr0_forward-inとし、送信元IPアドレス192.168.10.0/24,宛先IPアドレス192.168.11.0/24のパケットを破棄します。
(☞) このIPアクセスリスト設定はbridge0インタフェース設定で登録します。
(☞) IPアクセスリストを設定しただけではフィルタとして有効にはなりません。フィルタリングを行うインタフェースでの登録が必要になります。
IPアクセスリスト名をbr1_forward-inとし、送信元IPアドレス192.168.11.0/24,宛先IPアドレス192.168.10.0/24のパケットを破棄します。
(☞) このIPアクセスリスト設定はbridge1インタフェース設定で登録します。
2. <bridge0インタフェース設定>
nxrg260(config-bridge)#ip address 192.168.10.1/24
bridge0インタフェースのIPアドレスを設定します。
IPアクセスリストbr0_forward-inをforward-inフィルタに適用します。
3. <bridge1インタフェース設定>
nxrg260(config-bridge)#ip address 192.168.11.1/24
bridge1インタフェースのIPアドレスを設定します。
IPアクセスリストbr1_forward-inをforward-inフィルタに適用します。
4. <有線LAN側(ethernet0)インタフェース設定>
nxrg260(config-if)#no ip address
ethernet0インタフェースのIPアドレスを無効にします。
5. <有線LAN側(ethernet0 vid 10)インタフェース設定>
ethernet0 vid 10インタフェースを設定します。
ブリッジグループを設定します。
(☞) ブリッジグループの番号はbridgeインタフェースの番号と同一のものを設定します。またポートはブリッジグループ内でユニークなものを設定する必要があります。
6. <有線LAN側(ethernet0 vid 11)インタフェース設定>
ethernet0 vid 11インタフェースを設定します。
ブリッジグループを設定します。
7. <無線LAN側(wlan0)インタフェース設定>
nxrg260(config-wlan)#no ip address
wlan0インタフェースのIPアドレスを無効にします。
ブリッジグループを設定します。
nxrg260(config-wlan)#wlan wpa-psk password nxrgwlan0pass
nxrg260(config-wlan)#wlan authenticate wpa2-psk aes
SSID、WPA-PSK認証方式で使用するパスワード、認証方式と暗号化方式を設定します。
(☞) WPA-PSK認証方式で使用するパスワードはWPA-PSKの認証方式および暗号化方式よりも先に設定する必要があります。
nxrg260(config-wlan)#wlan access-point-bridge enable
nxrg260(config-wlan)#wlan max-associations 32
ゲストモード、アクセスポイントブリッジを有効に設定します。また接続台数制限を設定します。
(☞) アクセスポイントブリッジを有効に設定することでプライバシープロテクションが無効になります。
8. <無線LAN側(wlan1)インタフェース設定>
nxrg260(config-wlan)#no ip address
wlan1インタフェースのIPアドレスを無効にします。
ブリッジグループを設定します。
nxrg260(config-wlan)#wlan wpa-psk password nxrgwlan1pass
nxrg260(config-wlan)#wlan authenticate wpa2-psk aes
SSID、WPA-PSK認証方式で使用するパスワード、認証方式と暗号化方式を設定します。
nxrg260(config-wlan)#wlan access-point-bridge enable
nxrg260(config-wlan)#wlan max-associations 32
ゲストモード、アクセスポイントブリッジを有効に設定します。また接続台数制限を設定します。
9. <無線モジュール(wifi0)設定>
nxrg260(config-wifi)#mode 11ac
nxrg260(config-wifi)#channel auto
無線方式、チャネルを設定します。
(☞) 802.11acで無線LANの通信速度を向上させたい場合はこちら
10. <DHCPサーバ設定>
nxrg260(config-dhcps)#network 192.168.10.0/24 range 192.168.10.200 192.168.10.210
nxrg260(config-dhcps)#gateway 192.168.10.1
nxrg260(config-dhcps)#dns-server 192.168.10.1
DHCPサーバのサーバナンバを1とし、配布するIPアドレス情報を設定します。
(☞) このDHCPサーバはSSID「nxrgwlan0」用(ethernet0 vid 10インタフェース配下の端末にも配布できます)となります。またbridge0インタフェースで動作します。
nxrg260(config-dhcps)#network 192.168.11.0/24 range 192.168.11.200 192.168.11.210
nxrg260(config-dhcps)#gateway 192.168.11.1
nxrg260(config-dhcps)#dns-server 192.168.11.1
DHCPサーバのサーバナンバを2とし、配布するIPアドレス情報を設定します。
(☞) このDHCPサーバはSSID「nxrgwlan1」用(ethernet0 vid 11インタフェース配下の端末にも配布できます)となります。またbridge1インタフェースで動作します。
11. <スタティックルート設定>
デフォルトルートを設定します。
12. <PPPアカウント設定>
PPPoE接続で使用するISP接続用ユーザID,パスワードを設定します。
(☞) ここで設定したアカウントはppp0インタフェースの設定で利用します。
13. <WAN側(ppp0)インタフェース設定>
nxrg260(config-ppp)#ip address negotiated
ppp0インタフェースのIPアドレスが動的IPアドレスの場合はnegotiatedを設定します。
nxrg260(config-ppp)#ip spi-filter
nxrg260(config-ppp)#ip tcp adjust-mss auto
IPマスカレード、ステートフルパケットインスペクションを有効に設定します。またTCP MSSの調整機能をオートに設定します。
PPPアカウント設定で登録したISP接続用ユーザIDを設定します。
14. <ethernet1インタフェース設定>
nxrg260(config-if)#no ip address
nxrg260(config-if)#pppoe-client ppp 0
PPPoEクライアントとしてppp0インタフェースを使用できるように設定します。
15. <DNS設定>
nxrg260(config-dns)#service enable
DNSサービスを有効にします。
16. <ファストフォワーディングの有効化>
ファストフォワーディングを有効にします。ファストフォワーディングを設定することによりパケット転送の高速化を行うことができます。
(☞) ファストフォワーディングの詳細および利用時の制約については、NXRシリーズのユーザーズガイド(CLI版)に記載されているファストフォワーディングの解説をご参照ください。
【 端末の設定例 】
| 192.168.10.0/24 | 192.168.11.0/24 | |||
| 有線端末 | 無線端末 | 有線端末 | 無線端末 | |
| IPアドレス | 192.168.10.100 | DHCPサーバから取得 | 192.168.11.100 | DHCPサーバから取得 |
| サブネットマスク | 255.255.255.0 | 255.255.255.0 | ||
| デフォルトゲートウェイ | 192.168.10.1 | 192.168.11.1 | ||
| DNSサーバ | ||||
【 補足 】
802.11acで無線LANの通信速度を向上させたい場合、以下の設定を有効にします。
<クワッドチャネル設定>
クワッドチャネル設定を有効にします。
(☞) クワッドチャネル設定を変更した場合は、guard-interval、channel、speed、txpower設定が削除されます(初期設定に戻ります)。
<A-MPDU設定>
A-MPDU設定を有効にします。
<A-MSDU設定>
A-MSDU設定を有効にします。
<ガードインターバル設定>
ガードインターバルをshortに設定します。
【 付録 】
目次
更新情報
→ 一覧へカテゴリ
タグ
- CRG
- DDNS
- DHCP
- DNAT
- DNSインターセプト
- Ethernet
- IIJモバイル
- IKE Modeconfig
- IKEv2 Configuration Payload
- IPinIP
- IPoE
- IPv6
- KDDI
- L2TPv3
- MAP-E
- NGN
- NTTドコモ
- PBR
- Policy Based IPsec
- PPP
- PPPoE
- QoS
- RADIUS連携
- RAシリーズ
- Route Based IPsec
- SMS
- SNAT
- SoftBank
- UPnP
- URL転送
- VLAN
- VRRP
- Web認証
- WiMAX
- コンフィグロールバック
- ネットイベント
- フィルタ
- ブリッジ
- モニタログ
- ワイモバイル
- 仮想スイッチ
- 冗長化
- 無線LAN