
FutureNet
NXR,VXRシリーズ
LXC編
1. LXC設定
1-5. LXCを使用したネットワーク設定(ブリッジの利用)
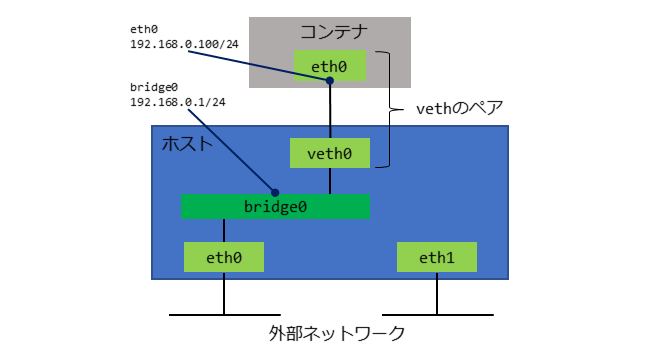
コンテナはNXR等のホスト(以下ホスト)を介して外部と通信できます。この例では、ホストのeth0とveth0をブリッジし、外部ネットワークと通信を行います。なお、コンテナはコンテナ番号1にマウント済みとします。また、コンテナのネットワーク設定はLXCコンソール接続とネットワーク設定を参考に設定済みとします。
【 ネットワーク構成 】
【 設定例 】
〔 NXR-G100シリーズ 〕
nxrg100#configure terminal
nxrg100(config)#interface veth 0
nxrg100(config-veth)#lxc-link 1
nxrg100(config-veth)#exit
nxrg100(config)#interface bridge 0
nxrg100(config-bridge)#ip address 192.168.0.1/24
nxrg100(config-bridge)#bridge port 1 ethernet 0
nxrg100(config-bridge)#bridge port 2 veth 0
nxrg100(config-bridge)#exit
nxrg100(config)#exit
nxrg100#save config
〔 NXR-650,NXR-610Xシリーズ,NXR-160/LW,NXR-G200シリーズ,NXR-G180/L-CA,NXR-G120シリーズ,NXR-G110シリーズ,VXRシリーズ 〕
nxrg240#configure terminal
nxrg240(config)#interface bridge 0
nxrg240(config-bridge)#ip address 192.168.0.1/24
nxrg240(config-bridge)#exit
nxrg240(config)#interface ethernet 0
nxrg240(config-if)#bridge-group 0 port 1
nxrg240(config-if)#exit
nxrg240(config)#interface veth 0
nxrg240(config-veth)#lxc-link 1
nxrg240(config-veth)#bridge-group 0 port 2
nxrg240(config-veth)#exit
nxrg240(config)#exit
nxrg240#save config
【 設定例解説 】
〔 NXR-G100シリーズ 〕
1. <veth0インタフェース設定>
nxrg100(config)#interface veth 0
veth0インタフェースを設定します。
nxrg100(config-veth)#lxc-link 1
lxc container1との仮想ブリッジを設定します。
2. <bridge0インタフェース設定>
nxrg100(config)#interface bridge 0
nxrg100(config-bridge)#ip address 192.168.0.1/24
nxrg100(config-bridge)#ip address 192.168.0.1/24
bridge0インタフェースのIPアドレスを設定します。
nxrg100(config-bridge)#bridge port 1 ethernet 0
nxrg100(config-bridge)#bridge port 2 veth 0
nxrg100(config-bridge)#bridge port 2 veth 0
ブリッジインタフェースで利用するインタフェースを設定します。
3. <設定の保存>
nxrg100#save config
設定内容を保存します。
〔 NXR-650,NXR-610Xシリーズ,NXR-160/LW,NXR-G200シリーズ,NXR-G180/L-CA,NXR-G120シリーズ,NXR-G110シリーズ,VXRシリーズ 〕
1. <bridge0インタフェース設定>
nxrg240(config)#interface bridge 0
nxrg240(config-bridge)#ip address 192.168.0.1/24
nxrg240(config-bridge)#ip address 192.168.0.1/24
bridge0インタフェースのIPアドレスを設定します。
2. <ethernet0インタフェース設定>
nxrg240(config)#interface ethernet 0
nxrg240(config-if)#bridge-group 0 port 1
nxrg240(config-if)#bridge-group 0 port 1
ethernet0インタフェースでブリッジグループを設定します。
(☞) ブリッジグループの番号はbridgeインタフェースの番号と同一のものを設定します。またポートはブリッジグループ内でユニークなものを設定する必要があります。
3. <veth0インタフェース設定>
nxrg240(config)#interface veth 0
veth0インタフェースを設定します。
nxrg240(config-veth)#lxc-link 1
lxc container1との仮想ブリッジを設定します。
nxrg240(config-veth)#bridge-group 0 port 2
ブリッジグループを設定します。
4. <設定の保存>
nxrg240#save config
設定内容を保存します。
目次
更新情報
→ 一覧へ- 2026.04.01NXR,VXR
IPsec編
4-9. Cloudflare WAN 接続(IPsec NAT-T/二重トンネル/ECMP/フェイルオーバー) - 2026.04.01NXR,VXR
IPsec編
4-8. Cloudflare WAN 接続(IPsec/二重トンネル/ECMP/フェイルオーバー) - 2026.03.10CB
CB-230編
1.1 CB-230 シリアルポートからのアラーム(バッテリー電圧異常)を受けてMAをシャットダウンさせる - 2026.03.05NXR,VXR
REST-API編
2-8. exec系,showコマンドの実行(maint/cli) - 2026.01.20NXR,VXR
無線LAN編
5-6. 無線 LAN 設定(802.11ax/6 GHz/RADIUS)
カテゴリ
タグ
- CRG
- DDNS
- DHCP
- DNAT
- DNSインターセプト
- Ethernet
- IIJモバイル
- IKE Modeconfig
- IKEv2 Configuration Payload
- IPinIP
- IPoE
- IPv6
- KDDI
- L2TPv3
- MAP-E
- NGN
- NTTドコモ
- PBR
- Policy Based IPsec
- PPP
- PPPoE
- QoS
- RADIUS連携
- RAシリーズ
- Route Based IPsec
- SMS
- SNAT
- SoftBank
- UPnP
- URL転送
- VLAN
- VRRP
- Web認証
- WiMAX
- コンフィグロールバック
- ネットイベント
- フィルタ
- ブリッジ
- モニタログ
- ワイモバイル
- 仮想スイッチ
- 冗長化
- 無線LAN