
- FutureNet製品活用ガイド
- FutureNet NXR,VXRシリーズ
- LANインタフェース編
FutureNet
NXR,VXRシリーズ
LANインタフェース編
3. VLAN設定
3-3. マルチプルVLAN設定
各ハブポートをVLAN毎にグループ化し、異なるVLANグループ間での通信を制限しつつ、インターネットアクセスなどは各VLANから行えるようにするマルチプルVLANの設定例です。
| コンテンツ | |||||
| 構成図 | 設定フロー | 設定例 | 設定例解説 | 端末の設定例 | 付録 |
【 構成図 】
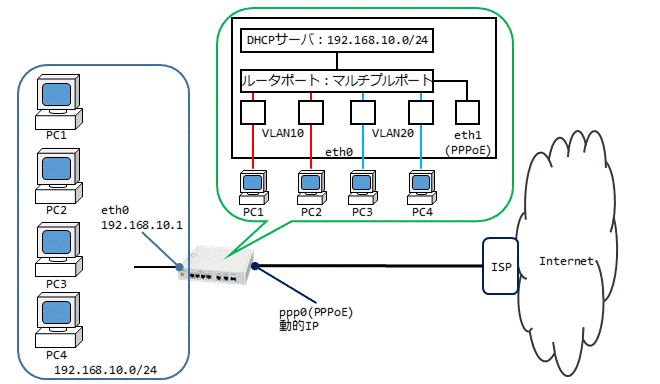
- 端末とルータのハブポートの接続状況は以下のとおりです。
端末名 ハブのポート番号 VLANグループ PC1 ポート1 VLAN10 PC2 ポート2 PC3 ポート3 VLAN20 PC4 ポート4
- 同一VLANグループ内での通信はできますが、異なるVLANグループ間での通信はできません。
- 各VLANグループともにインターネットアクセスおよびルータのDHCPサーバ機能からIPアドレスなどを取得できます。
【 設定フロー 】

【 設定例 】
Enter configuration commands, one per line. End with CNTL/Z.
nxrg240(config)#interface ethernet 0
nxrg240(config-if)#ip address 192.168.10.1/24
nxrg240(config-if)#vlan-database vid 1
nxrg240(config-if)#vlan-database vid 10
nxrg240(config-if)#vlan-database vid 20
nxrg240(config-if)#switchport 1 default-vlan-id 10
nxrg240(config-if)#switchport 1 vlan 10 untagged
nxrg240(config-if)#switchport 2 default-vlan-id 10
nxrg240(config-if)#switchport 2 vlan 10 untagged
nxrg240(config-if)#switchport 3 default-vlan-id 20
nxrg240(config-if)#switchport 3 vlan 20 untagged
nxrg240(config-if)#switchport 4 default-vlan-id 20
nxrg240(config-if)#switchport 4 vlan 20 untagged
nxrg240(config-if)#switchport router vlan 10 untagged
nxrg240(config-if)#switchport router vlan 20 untagged
nxrg240(config-if)#exit
nxrg240(config)#dhcp-server 1
nxrg240(config-dhcps)#network 192.168.10.0/24 range 192.168.10.200 192.168.10.210
nxrg240(config-dhcps)#gateway 192.168.10.1
nxrg240(config-dhcps)#dns-server 192.168.10.1
nxrg240(config-dhcps)#exit
nxrg240(config)#ip route 0.0.0.0/0 ppp 0
nxrg240(config)#ppp account username test1@example.jp password test1pass
nxrg240(config)#interface ppp 0
nxrg240(config-ppp)#ip address negotiated
nxrg240(config-ppp)#ip masquerade
nxrg240(config-ppp)#ip spi-filter
nxrg240(config-ppp)#ip tcp adjust-mss auto
nxrg240(config-ppp)#ppp username test1@example.jp
nxrg240(config-ppp)#exit
nxrg240(config)#interface ethernet 1
nxrg240(config-if)#no ip address
nxrg240(config-if)#pppoe-client ppp 0
nxrg240(config-if)#exit
nxrg240(config)#dns
nxrg240(config-dns)#service enable
nxrg240(config-dns)#exit
nxrg240(config)#fast-forwarding enable
nxrg240(config)#exit
nxrg240#save config
【 設定例解説 】
1. <LAN側(ethernet0)インタフェース設定>
nxrg240(config-if)#ip address 192.168.10.1/24
ethernet0インタフェースのIPアドレスを設定します。
nxrg240(config-if)#vlan-database vid 10
nxrg240(config-if)#vlan-database vid 20
スイッチポートで使用するVLAN IDを設定します。
nxrg240(config-if)#switchport 1 vlan 10 untagged
スイッチポート1のPVIDを設定します。またこのポートをuntaggedに設定します。
nxrg240(config-if)#switchport 2 vlan 10 untagged
スイッチポート2のPVIDを設定します。またこのポートをuntaggedに設定します。
nxrg240(config-if)#switchport 3 vlan 20 untagged
スイッチポート3のPVIDを設定します。またこのポートをuntaggedに設定します。
nxrg240(config-if)#switchport 4 vlan 20 untagged
スイッチポート4のPVIDを設定します。またこのポートをuntaggedに設定します。
nxrg240(config-if)#switchport router vlan 20 untagged
ルータポートのVLANID10,20をuntaggedに設定します。
2. <DHCPサーバ設定>
nxrg240(config-dhcps)#network 192.168.10.0/24 range 192.168.10.200 192.168.10.210
nxrg240(config-dhcps)#gateway 192.168.10.1
nxrg240(config-dhcps)#dns-server 192.168.10.1
DHCPサーバを設定します。
3. <スタティックルート設定>
デフォルトルートを設定します。
4. <PPPアカウント設定>
ppp0インタフェースで使用するISP接続用ユーザID,パスワードを設定します。
(☞) ここで設定したアカウントはppp0インタフェースの設定で指定します。
5. <WAN側(ppp0)インタフェース設定>
nxrg240(config-ppp)#ip address negotiated
ppp0インタフェースのIPアドレスが動的IPアドレスの場合、negotiatedを設定します。
nxrg240(config-ppp)#ip spi-filter
nxrg240(config-ppp)#ip tcp adjust-mss auto
IPマスカレード、ステートフルパケットインスペクションを有効にします。またTCP MSSの調整機能をオートに設定します。
ISP接続用ユーザIDを設定します。
(☞) PPPアカウント設定で登録したアカウントを設定します。
6. <ethernet1インタフェース設定>
nxrg240(config-if)#no ip address
nxrg240(config-if)#pppoe-client ppp 0
PPPoEクライアントを設定します。また使用するPPPインタフェースとしてppp0を指定します。
7. <DNS設定>
nxrg240(config-dns)#service enable
DNSサービスを有効にします。
8. <ファストフォワーディング設定>
ファストフォワーディングを有効にします。ファストフォワーディングを有効にすることでパケット転送を高速に処理することができます。
(☞) ファストフォワーディングの詳細および利用時の制約については、NXR,WXRシリーズのユーザーズガイド(CLI版)に記載されているファストフォワーディングの解説をご参照ください。
【 端末の設定例 】
| VLAN10 | VLAN20 | |
| IPアドレス | DHCPサーバから自動取得 | DHCPサーバから自動取得 |
| サブネットマスク | ||
| デフォルトゲートウェイ | ||
| DNSサーバ |
【 付録 】
目次
更新情報
→ 一覧へカテゴリ
タグ
- CRG
- DDNS
- DHCP
- DNAT
- DNSインターセプト
- Ethernet
- IIJモバイル
- IKE Modeconfig
- IKEv2 Configuration Payload
- IPinIP
- IPoE
- IPv6
- KDDI
- L2TPv3
- MAP-E
- NGN
- NTTドコモ
- PBR
- Policy Based IPsec
- PPP
- PPPoE
- QoS
- RADIUS連携
- RAシリーズ
- Route Based IPsec
- SMS
- SNAT
- SoftBank
- UPnP
- URL転送
- VLAN
- VRRP
- Web認証
- WiMAX
- コンフィグロールバック
- ネットイベント
- フィルタ
- ブリッジ
- モニタログ
- ワイモバイル
- 仮想スイッチ
- 冗長化
- 無線LAN